Sketching Kadr-1
A couple of weeks ago I started sketching a possible hardware layout for Kadr-1, the handheld lidar and camera rig I'm building. The main issue was to figure out which sensors go where, what holds them together and how the whole rig looks in hand. I don't draw, so that's a problem. Instead of a sketchbook I used three.js. The result is here: it is a browser 3D model that shows how all the pieces fit together and skips the true CAD details which I don't really need now. Take a look.
As I said, I don't draw — but I probably should, because a good technical drawing provides rich context to LLMs. Generating a CAD model from a drawing is not a big deal, LLMs are already really good at doing something like this.
The lesson is to make a complete 3D model in CAD only. Do not aim for a detailed 3D model in three.js — you'll just derive wrong numbers that look OK. I went a bit too far adding countersinks, mount points and screws right in the JS model. That was a mistake that cost me several wasted days and a lot of tokens. First, three.js is a completely wrong tool for that: there's no procedural verification of element positioning. Second, you may derive numbers that look reasonable at first glance, but are completely wrong in reality. Three.js is not CAD, and you'll just have to undo everything and start from scratch. Do yourself a favor — prototype the basic layout in three.js (or on paper) and proceed straight to CAD.
Three questions about the rig
I had very basic questions in mind:
- How to position the camera and the lidar on the rig? Is a SmallRig 1092 cheese plate (155 x 80 mm) big enough for both?
- What to do with the rear side of the rig? Should there be a display? Or a Jetson? Will the Jetson even fit?
- Should I tilt the lidar and to what extent? The camera should be mounted level. The lidar is a different story and its tilt needed exploration.
From the 3D model it is clear the plate has enough room. The sensor unit takes the front half, and the rear half holds everything else. The most important property of the rig, and the sensor suite, is rigidity. The suite is supposed to be calibrated once and kept that way for several sessions. For this purpose, a detachable iPhone instead of the Arducam would not work: it would spoil calibration after every detachment.
The answer to the rear side turned out to be both. The Jetson AGX Orin stands on its side behind the sensors with the fan aft. At 1.58 kg it is about two thirds of the rig's mass. This is an experimental configuration, of course, a production device should not carry a devkit, and an Orin Nano/NX is much more appropriate. An iPhone on a small clamp arm can be used as a live SLAM monitor, I'm not showing the arm in the model, but it is easy to add. Live SLAM is necessary here as I need to be sure the scan process works, and I don't have unnoticed voids in the scan.
Why tilt the lidar
The Livox Mid-360 is a 360-degree lidar, but only horizontally. Vertically it sees from 7 degrees below the horizon to 52 degrees above, so the covered area is a band: it has a blind cone above the sensor and a dead zone below. As I'm planning to use SLAM that fuses the odometry, a visual signal from the camera, and the point cloud from the Mid-360, my best option is to project as many points into the current camera frame as possible. This is reasonable to get the best results for SLAM. So the lidar leans forward into the camera's field of view. The camera with zero pitch sees what I see, and the lidar is tilted forward.
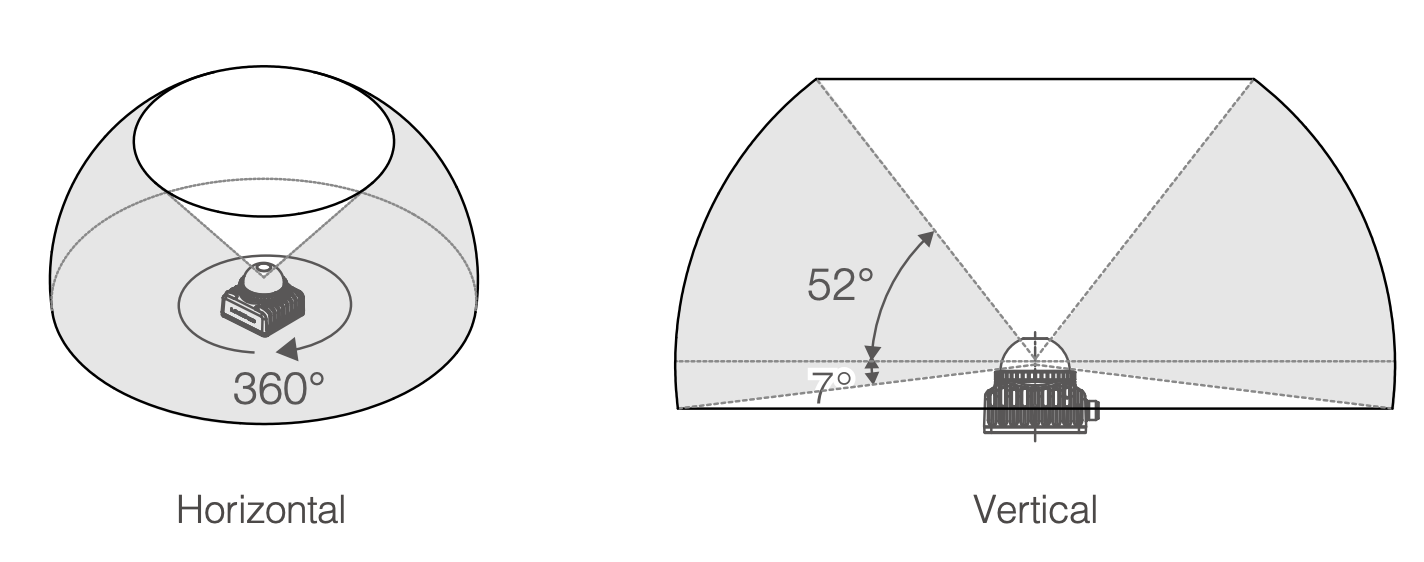
This setup is far from ideal — and I'll show it in the next note and visualization — but it is the simplest and most straightforward option available. It is just one USB global-shutter camera and one lidar. Even for such a simple configuration, I expect problems. I need to take care of the sensor synchronization and I just hope the USB camera won't jitter too much with its timestamps. Fortunately, it doesn't require self-driving-grade timesync tolerance, but I still don't expect a smooth ride regarding timesync.
The sketch shows the lidar tilt at 26°. This is another topic for discussion, and I'm going to cover it with another demo in my next note. Stay tuned!